Author - Alba Baños

Printing design Photoshop

Acquisition of Inèdit Software advances Efi’s growth strategy in high-value digital imaging

Electronics For Imaging, Inc. (“EFI™”), a Siris portfolio company, today announced that it has acquired Inèdit Software S.L., a developer of raster image processors (RIPs) and related software for digital industrial textile printing. The acquisition extends EFI’s strategy to accelerate digital transformation in industrial print through investments that advance the company’s presence and capabilities in Packaging & Corrugated, Display Graphics, Textile, and Building Materials/Décor applications. Inèdit will be integrated into the Reggiani textile business.

“Digital represents the biggest transformational opportunity we have ever seen in industrial printing,” said EFI CEO and Executive Chairman Jeff Jacobson. “We are committed to driving innovation and expanding our offerings through all economic cycles as we address our customers’ critical need to digitize and automate their workflows.”

Delivering powerful digital print workflows for textile

Based in Barcelona, Inèdit will help build on the market leadership of the EFI Reggiani portfolio of digital inkjet printing products for the industrial textile space. 

“We are enthusiastic about the expanded business opportunities this acquisition creates by reinforcing EFI Reggiani’s strategic role as a trusted advisor for our customers,” said EFI Reggiani Senior Vice President and General Manager Adele Genoni. “Inèdit’s products and its world-class professional services organization open the door to creating more-complete digital printing workflows that leverage best-in-class digital technologies. Our customers can continue to win new opportunities and grow by establishing higher-volume, higher-quality digital production services in ways that reduce the textile industry’s high carbon footprint.

“Inèdit’s extensive market coverage will be a key point of emphasis to fully leverage the strategic synergies arising from the combination of the EFI Reggiani and Inèdit businesses,” Genoni continued. “It is an acquisition that significantly strengthens our presence in key textile markets.” 

Similar to EFI’s Fiery® digital front end and RIP technologies for the digital commercial and industrial printing markets, Inèdit’s neoStampa product is a worldwide leader and recognized benchmark solution for RIPs in digital textile printing. The Inèdit product portfolio features proven, highly advanced workflow solutions for textile profiling, calibration, design integration and much more. Inèdit’s RIP technology is employed across the worldwide textile industry and is a leading RIP used to drive EFI Reggiani digital printers and other digital industrial textile printer brands. As part of EFI Reggiani, Inèdit will continue to support products for a broad range of digital printers. 

“Becoming part of the EFI Reggiani business empowers us to develop and deliver an even greater level of end-to-end textile integrated workflow solutions and Industry 4.0-driven automation enhancements that will further drive customers’ productivity, printing performance, profitability and sustainability in textile printing,” said Jose Antonio Caballero, Co-founder and Sales Manager of Inèdit. “Our team is excited to join a company that is a leading innovator in digital textile printing.”

Inèdit’s employees are joining EFI Reggiani but will continue to work from their current offices. Terms of the acquisition were not disclosed.

Read more...

Understanding the advantages of RIP Software for DTG

The importance of digital textile printing has grown significantly throughout the last decade. While the process is challenging and the workflow must be well understood, technological advances in software, printing equipment, print heads and inks, have allowed the creation of more cost-effective solutions for short print runs.

Direct-to-garment [DTG] printing represents a growing segment of this market. This is because of the technology’s ability to customise garments. The basis of DTG production is finished and, in many cases, pre-prepared garments, which can be used for customisation both on a large scale and in small volumes. There are two types of machines on the market: commercial and industrial. Traditionally, the first ones were found in local businesses where very short customisation runs or premium clothes were produced. In contrast, the industrial printers are responsible for larger runs in factories that focus on outsourcing. 

Today, a hybrid between the two previous models is emerging and the popularisation of mass customisation, boosted by the growth of ecommerce, is facilitating that. With this model, companies provide users with a production centre in just a few clicks. They will be able to print their own designs on-demand and with no minimum or maximum number of repetitions. It enables companies to be more flexible in responding to both individual orders and larger print runs. 

From a supply chain point of view, there is a requirement among print service providers for both machine types, either through synergies or by expanding resources. For this reason, DTG is gaining more and more strength as it allows companies to choose from a wide range of devices which can adapt to the needs of each manufacturer and situation on an individual basis, thus simplifying customisation in the fashion and apparel market. 

RIP software for DTG printing

Behind every good DTG print, there is a learning process based on the technology used to create a workflow, how this technology has been adapted to meet the needs of the print service provider, and the requirements of the end consumer. Manufacturer’s must learn about the printers, the inks, the fabrics, and especially the software to enhance results. 

RIP software is responsible for interpreting a file and calculating how many drops of each colour will be needed to obtain the best results. It does this while considering the productivity of the printing device. 

In other words, if you invest in a DTG printer, whether industrial or desktop, RIP software is the solution to allow manufacturers to get the most out of a printer’s functionalities. 

Inèdit always recommends RIP software with modes specifically designed for DTG printing. But which key features should be measured when looking for the right RIP software?

The right software

It is important to consider colour management. With RIP software you can operate with CMYK and RGB colour profiles. The difference between the two methods lies in the way they interpret the colours they have. In short, CMYK profiles have four inks and create colours from the superposition of these. White is created from the absence of these colours and black is created from the sum of these colour profiles.

Meanwhile, the RGB method has three inks and creates new colours from the variation of their light. This allows for the interpretation of a wider range of colours. Therefore, a RIP that works in RGB will significantly increase the number of colours that a printer can export, thus improving printing quality.

An RIP software’s calibration system also influences the accuracy of a colour base when printing. Calibration is carried out to understand what colour interpretation capacity a device has, and then indicates how each of the colours and gradients should be exported. An intuitive and fast calibration system is what Inèdit recommends when printing DTG. RIP software should also have integrated concepts to calculate the ink limit, make linearisations, and see the profile of the printer in operation. 

Additionally, in discovering the right RIP software, white management must be factored in. The white channel in DTG printing is one of its main features. With the correct white management, it is possible to save money and ink in production runs. In DTG printing, the white channel is used to create a layer between the substrate and the ink when the substrate is black, or a specific colour, so that the colour of the printed ink is not affected by the substrate. The disadvantage of not managing this channel is that the use of white ink increases significantly, thus affecting the price of production. It is therefore important to have a RIP software that has a set of defined standards. 

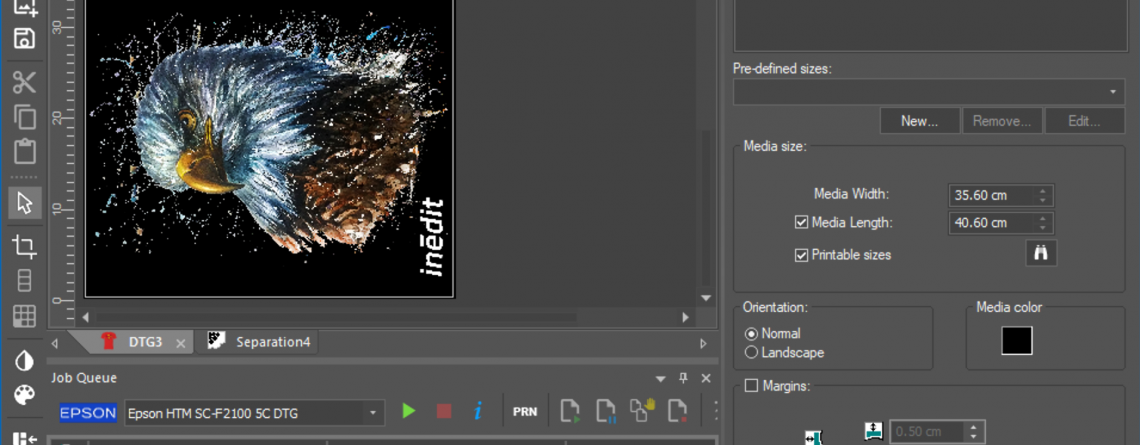
For instance, neoStampa Delta incorporates different printing modes depending on the use of white ink. Printers can choose between creating an all-white background under the drawing, or use default values for black, grey and coloured backgrounds. 


Another benefit of the white channel generation is that it allows hybrid DTG printers to detect the white they are going to print first and the colour channels they are going to put on top of it.

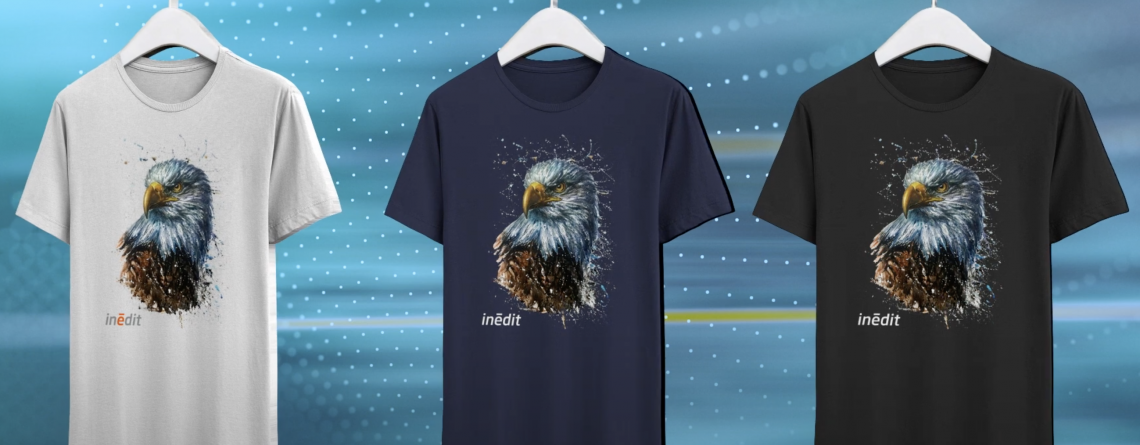
However, the settings for black backgrounds should also be understood. The RIP software should allow print service providers to use the black background of a T-shirt, for example, as to avoid using black ink or creating greys by mixing white ink with the same background. By using this type of configuration, up to US$0.60 per print, and up to 30% of white ink consumption, can be saved. 

Moreover, RIP software should have a choke system. This is the method that avoids registration problems when printing an image on a background colour. It should also support transparency: accept several formats that use a transparent colour or an alpha channel and take advantage of the T-shirt background. 

On-demand printing

DTG print service providers have traditionally provided for end consumers on-demand thanks to growth in ecommerce.  However, there is growing trend among leading brands to capitalise on the growing demand for personalised fashion and Web2Print. Some larger brands have been implementing DTG to limited short-run collections based on the latest fashion trends inspired by online influencers and celebrities. 

In the industrial field, this translates into the need to generate more agile communication with the customer and faster and more efficient production. Therefore, digital printing continues to grow as it allows for the start and stop of print runs at any time.

Web2Print has been born in response to this new trend. It consists of personalisation at its maximum exponent, allowing a customer, both individuals and businesses, to send a file in a specific format from 

a website so that the manufacturer can print it directly, whether it is just one unit or a short print run. But how can RIP software help in this whole process? 

Firstly, it maintains the colour output that the customer expects when sending a file and secondly, it helps the manufacturer organise the workflow and extract cost information. 

If a customer sends a file with an embedded profile – for instance, Adobe RGB or Apple RGB – it is easy for the manufacturer to access those from their RIP software, as long as it is specialised in RGB. This way, the printed colours will meet expectations because they accurately match what the customer saw on screen when they originally placed the order. This process also reduces the need for sampling. 

From a manufacturer’s point of view, Inèdit highlights two drawbacks that could be solved with a good RIP software. The first of these is a lack of organisation when receiving work orders and transferring them to production. A very useful concept included in some RIP software is the print queues. These arrange pending work orders into different queues according to the production printer that is going to be used. 

In addition, there is some RIP software, like neoStampa, which enables users to access print queues remotely from anywhere in the world: printing sequences can be organised, the preferred output for each machine can be set, and print runs can be stopped and resumed at any time. All of this can be dictated from outside the manufacturing facility and simplifies the flow of communication from any department anywhere in the world. 

Furthermore, it is important that the software incorporates a cost control screen. This is how manufacturers put a price on orders placed online or remotely. A cost control system will consider both the productivity of a company and the costs derived from it. Therefore, by knowing the units needed for each run, the current ink price, and the cost of consumables, basic production costs can be generated. That helps manufacturers apply a final price to the printed product. 

[sub-head] neoStampa Delta for DTG

For years, Inèdit has been working with leading DTG printing brands such as SanRoq, Epson and Brother but this year has taken a further step by launching a new version of neoStampa Delta which is equipped with a module dedicated to the high-growth digital DTG printing market. The latest software upgrade is designed to work with both small- and large-format printers.

Read more...

DTF vs DTG: Which is the best alternative?

The pandemic has prompted the small studios focused on Print-on-demand production and with it, DTG and DTF printing have hit the market, increasing the interest of manufacturers who want to start working with personalized garments.  

Since now, Direct-to-garment (DTG) has been the main method used for t-shirt printings and small productions, but in the last months Direct-to-film or Film-to-Garment (DTF)  has generated interest in the industry, winning every time more supporters. To understand this paradigm shift, we need to know what the differences are between one method and the other. 

Both types of printing are suitable for small items or personalisation, such as T-shirts or masks. However, the results and the printing process are different in both cases, so it can be difficult to decide which one to choose for a business. 

DTG: 

  • It needs pre-treatment: In the case of DTG, the process starts with the pre-treatment of the garments. This step is necessary before printing, as we are going to work directly on the fabric and this will allow the ink to be well fixed and avoid transferring it through the fabric. In addition, we will need to heat the garment before printing to activate this treatment.
  • Printing direct to garment: With DTG you are printing Direct to Garment, so the process can be shorter than DTF, you don’t need to transfer. 
  • White ink usage: We have the option of putting a white mask as a base, to ensure that the ink does not mix with the colour of the media, although this is not always necessary (for example on white bases) and it is also possible to reduce the use of this mask, putting white only in some areas. 
  • Printing on cotton: With this type of printing we can only print on cotton garments. 
  • Final press: To fix the ink, we must do a final press at the end of the process and we will have our garment ready. 

DTF: 

  • No need for pre-treatment: In DTF printing, as it is pre-printed on a film, which will have to be transferred, there is no need to pre-treat the fabric. 
  • Printing on film: In DTF we print on film and then the design must be transferred to the fabric. This can make the process a bit longer compared to DTG. 
  • Adhesive powder: This type of printing will require the use of an adhesive powder, which will be used just after printing the ink on the film. On printers specifically created for DTF this step is included in the printer itself, so you avoid any manual steps. 
  • Use of white ink: In this case, it is necessary to use a layer of white ink, which is placed on top of the color layer. This is the one that is transferred onto the fabric and serves as a base for the main colours of the design. 
  • Any type of fabric: One of the advantages of DTF is that it allows you to work with  any type of fabric, not just cotton. 
  • Transfer from film to fabric: The last step of the process is to take the printed film and transfer it to the fabric with a press. 

So,  When deciding which print to choose, what considerations should we take into account? 

  • The material of our printouts: As mentioned above, DTG can only be printed on cotton, whereas DTF can be printed on many other materials. 
  • The production volume: Currently, DTG machines are much more versatile and allow for larger and faster production than DTF. So it is important to be clear about the production needs of each business. 
  • The result: The final result of one print and the other is quite different. While in DTG the drawing and the inks are integrated with the fabric and the feel is rougher, like the base itself, in DTF the fixing powder makes it feel plastic, shinier, and less integrated with the fabric. However, this also gives a feeling of greater quality in the colors, as they are pure, the base color does not intervene.
  • Use of white: A priori, both techniques need quite a lot of white ink to print, but with the use of a good Rip Software, it is possible to control the layer of white that is applied in DTG, depending on the base colour and thus reduce costs considerably. For example, neoStampa has a special print mode for DTG that not only allows you a quick calibration to improve the colours, but you can also choose the amount of white ink to use on different types of fabrics.

In a nutshell, DTF printing seems to be gaining ground over DTG, but in reality, they have very different applications and uses. For small-scale printing, where you are looking for good color results and you don’t want to make such a large investment, DTF may be more suitable. But the DTG now has more versatile printing machines, with different plates and processes, which allow faster and more flexible printing.  

Read more...

Understanding the advantages of RIP software for DTG printing

Inèdit Software assesses the benefits of direct-to-garment (DTG) printing, its impact on the industry, and how the use of the right software can improve production workflows and end results.

The importance of digital textile printing has grown significantly throughout the last decade. While the process is challenging and the workflow must be well understood, technological advances in software, printing equipment, printheads and inks, have allowed the creation of more cost-effective solutions for short print runs.

Direct-to-garment [DTG] printing represents a growing segment of this market. DTG printers can be used to customise products in large or small volumes. There are two types of machines on the market: commercial and industrial. Traditionally, DTG printers were used by local businesses where short customisation runs or premium clothes were produced. In contrast, industrial printers are responsible for larger runs in factories that focus on outsourcing.

Today, a hybrid between the two previous models is emerging and the popularisation of mass customisation is facilitating that. With this model, companies provide users with a production centre in just a few clicks. They will be able to print their own designs on-demand and with no minimum or maximum number of repetitions. It enables companies to be more flexible.

From a supply chain point of view, there is a requirement among print service providers for both machine types, either through synergies or by expanding resources. For this reason, DTG is gaining more and more strength as it allows companies to choose from a wide range of devices which can adapt to the needs of each manufacturer and situation on an individual basis, thus simplifying customisation in the fashion & apparel market.

Colour management is a persistent challenge but which RIP software can assist with

Inèdit is aiming to expand its signature neoStampa Delta software into the DTG market in 2020 following the inclusion of a new module

RIP software can streamline production and improve print quality

RIP SOFTWARE FOR DTG PRINTING

Behind every good DTG print is a learning process based on the technology used to create a workflow, how this technology has been adapted to meet the needs of the print service provider, and the requirements of the end consumer. Manufacturers must learn about the printers, inks, fabrics, and especially the software to enhance results.

RIP software is responsible for interpreting a file and calculating how many drops of each colour will be needed to obtain the best results. It does this while considering the productivity of the printing device.

Inèdit always recommends RIP software with modes specifically designed for DTG printing. But which key features should be measured when looking for the right RIP software?

THE RIGHT SOFTWARE

It is important to consider colour management. When choosing a RIP software you can find the ones that operate in CMYK and the ones that can also read RGB profiles. The difference between the two methods lies in the way they interpret the colours they have. In short, CMYK profiles have four inks and create colours from the superposition of those. White is created from the absence of these colours and black is created from the sum of these colour profiles.

Meanwhile, the RGB method has three inks and creates new colours from the variation of their light. This allows for the interpretation of a wider range of colours. Therefore, a RIP that works in RGB will significantly increase the number of colours that a printer can export, thus improving printing quality.

A  RIP software’s calibration system also influences the accuracy of a colour base when printing. Calibration is carried out to understand what colour interpretation capacity a device has, and then indicates how each of the colours and gradients should be exported. An intuitive and fast calibration system is what Inèdit recommends when printing DTG. RIP software should also have integrated concepts to calculate the ink limit, make linearisations, and see the profile of the printer in operation.

Additionally, in discovering the right RIP software, white management must be factored in. The white channel in DTG printing is one of its main features. With the correct white management, it is possible to save money and ink in production runs. In DTG printing, the white channel is used to create a layer between the substrate and the ink when the substrate is black, or a specific colour, so that the colour of the printed ink is not affected by the substrate. The disadvantage of not managing this channel is that the use of white ink increases significantly, thus affecting the price of production. It is therefore important to have a RIP software that has a set of defined standards.

For instance, neoStampa Delta incorporates different printing modes depending on the use of white ink. Printers can choose between creating an all-white background under the drawing, or use default values for black, grey and coloured backgrounds.

Another benefit of the white channel generation is that it allows hybrid DTG printers to detect the white they are going to print first and the colour channels they are going to put on top of it.

However, the settings for black backgrounds should also be understood. The RIP software should allow print service providers to use the black background of a T-shirt, for example, as to avoid using black ink or creating greys by mixing white ink with the same background. By using this type of configuration, up to US$0.60 per print, and up to 30% of white ink consumption, can be saved.

Moreover, RIP software should have a choke system. This is the method that avoids registration problems when printing an image on a background colour. It should also support transparency: accept several formats that use a transparent colour or an alpha channel and take advantage of the T-shirt background.

ON-DEMAND PRINTING

DTG print service providers have traditionally provided for end consumers on-demand thanks to growth in ecommerce. However, there is a growing trend among leading brands to capitalise on an increasing demand for personalised fashion via Web2Print. Some larger brands have been implementing DTG to print short-run collections based on the latest fashion trends inspired by online influencers and celebrities.

In the industrial field, this translates into the need to generate more agile communication with the customer and faster and more efficient production. Therefore, digital printing continues to grow as it allows for the start and stop of print runs at any time.

Web2Print has been born in response to this new trend. It allows a customer to send a file in a specific format so that the manufacturer can print it, and the order size is irrelevent. But how can RIP software help in this whole process?

Firstly, it maintains the colour output that the customer expects when sending a file and secondly, it helps the manufacturer organise the workflow and extract cost information.

If a customer sends a file with an embedded profile – for instance, Adobe RGB or Apple RGB – it is easy for the manufacturer to access it from their RIP software, as long as it is specialised in RGB. This way, the printed colours will meet expectations because they accurately match what the customer saw on screen when they originally placed the order. This process also reduces the need for sampling.

From a manufacturer’s point of view, Inèdit highlights two drawbacks that could be solved with a good RIP software. The first of these is a lack of organisation when receiving work orders and transferring them to production. A very useful concept included in some RIP software is the print queue. These arrange pending work orders into different queues according to the production printer that is going to be used.

In addition, there is some RIP software, like neoStampa, which enables users to access print queues remotely from anywhere in the world: printing sequences can be organised, the preferred output for each machine can be set, and print runs can be stopped and resumed at any time. All of this can be dictated from outside the manufacturing facility and simplifies the flow of communication from any department anywhere in the world.

Furthermore, it is important that the software incorporates a cost control screen. This is how manufacturers put a price on orders placed online or remotely. A cost control system will consider both the productivity of a company and the costs derived from it. Therefore, by knowing the units needed for each run, the current ink price, and the cost of consumables, basic production costs can be generated. That helps manufacturers apply a final price to the printed product.

NEOSTAMPA DELTA FOR DTG

For years, Inèdit has been working with leading DTG printing brands such as SanRoq, Epson and Brother but this year has taken a further step by launching a new version of neoStampa Delta which is equipped with a module dedicated to the high-growth digital DTG printing market. The latest software upgrade is designed to work with both small- and large-format printers.
Article written for Digital Textile Magazine

Read more...

5 tricks to create a good profile that only the best will know: 

A profile is one of the main concepts to know and master when talking about colour management. If you want to print accurate colours and get the most out of your colour output devices, you need to know the steps to get the best possible profile.

To start talking about profiles, we need to have the concept clear. So let’s go with a definition: 

A profile is a file that contains the colour information that can be interpreted by a device, either input (like a scanner or digital camera) or output (like a printer or screen). 

It is necessary to have two profiles: a standard one and the printer itself since the final profile will be created from a mathematical relation between the standard colour space (the input one) and the capacity of the device to interpret it. 

In this article, we will focus on the creation of profiles for digital printers. 


Introduction to the creation of profiles: 

To create a profile you will need to have some tools with you: a good Rip Software to help you interpret the capacity of your printer, a colour measurement device (spectrophotometer), the output device (The digital printer in this case), and other material needed (For example paper, fabric, plate, etc.)

In addition, we need to know which media you are going to use. If you are going to print on paper, the calibration and the consequent creation of the profile will be much easier, since only one material is involved in the process. 

If, on the other hand, we want to create a dye-sublimation profile, we have to take into account the tools that come into play: the plate, the fabric, the dye-sublimation paper, etc. so it is more complicated to create a stable profile. 


5 tips to create the best profiles: 

Now that we understand the concept of a print profile, we would like to share 5 tips that our technicians apply in order to obtain the best results: 

1.Create the profile using the final production conditions: It is important to understand that the process of creating a new profile aims to obtain the best colour results in the final productions. For this reason, it is necessary to reproduce the same printing conditions that we will use at the moment of truth. We do not recommend using cheaper paper or fabrics for calibration or using an iron instead of a calendar. With this, we only will obtain non-expected results. 

2. Work with Rip Software that facilitates the creation of the profile: It is very important to work with software that can understand the colour interpretation capacity of your printer, but it is also very necessary that the Rip Software facilitates the process of creating your profile. To do this, we recommend, first of all, that the Rip has a calibration wizard that guides you through this process step by step. 

3. Read, read and read: If you have ever worked with us or attended one of our courses you will know that there is a motto that we do always repeat: Read with the spectrophotometer three times. This way you will get three different colour results, which you can compare and get an average of the colour that will be the closest to the printing possibilities of your machine. 

4. Keep the printing devices in good condition: Check that at the time of creating the profile all the equipment involved in printing is in good condition and correctly configured. 

5. Profile and re-profile: We also recommend checking the printing results periodically and, if necessary, re-creating the profile. In neoStampa we have the option of re-profiling, which will allow you to analyse what has changed in your printer in order to adjust the profile again. 

We hope you have enjoyed our post and remember that if you have any doubts, you can contact us directly by writing to sales@inedit.com

Read more...

Design in RGB for better print results

Designing in RGB for printing is possible.

One of the first decisions we will have to face in the design process for printing will be the color method we want to use: CMYK or RGB. There is a general belief that we should work in RGB for designs that are going to be seen on a screen, while the CMYK method is for physical prints. Today in Inèdit’s blog we are going to dismantle this myth:

A bit of theory: CMYK vs RGB

The CMYK color model focuses on four colors: Cyan (C), Magenta (M), Yellow (Y) and Black (K). With CMYK we use the Subtractive method, by which colors are superimposed on the print to create the desired result. The absence of color will be white while 100% of the color black, but in addition, there is the “K” option that will allow us to create this black, with less ink consumption and a more intense color.
RGB is based on the colors Red (R), Green (G) and Blue (B) and works with additive synthesis, which consists of varying the intensity of light in the three main colors to create one again. This means that the more light we add, the brighter the results. So, 100% of light in each color will result in white and, conversely, 0% will result in black. In RGB, by playing with lightness we increase the variety of colors we can create compared to CMYK.

It is true that the vast majority of digital printers and plotters used to work in four-color printing, in other words, with the four colors that make up CMYK, limiting color results, but today this no longer happens.

Continue designing in CMYK?

In the digital printing sector things are changing a lot and color management and reproducibility are becoming more and more important.

Currently, printer manufacturers are focused on offering a greater number of inks, going beyond CMYK, in order to expand the color range of printing and be more competitive in the market.

We can find orange, blue, violet, turquoise, and even fluorescents in the ink options. In addition, the machines are constantly increasing their capacity, reaching to hold 8, 10 or even 12 different inks.
So we ask ourselves, does it make sense to keep working from the design only in CMYK, limiting the colors, when maybe the production printer has a wider color range?

Design in RGB to get the desired color results.
From our point of view, no. By using printers with a wider range of colors and working with all the necessary tools, it will be possible for you to end up printing the colors you see on screen, without having to juggle to imagine how the four CMYK inks will mix at the time of design.

One of the great allies for this color reproduction is the Rip Software you are using. For example, neoStampa is one of the rips that creates your print profiles in RGB. This allows you to have a standard color range, regardless of the number of inks in the printer, and that works in the same language as the designer’s screen or monitor. This way, you keep the color from the design until the final printing and the designer can focus on what really matters, creating with the colors that they like.

Read more...

Why is Adobe Photoshop the best tool on the market for textile design and color management?

Adobe Photoshop: The leading tool in the design

In the last decades, Adobe Photoshop has positioned itself as one of the most important tools in the management of pixel-based images. With Photoshop, not only do we have at our disposal a wide range of tools for editing, transforming, and enhancing images, but you can also access a wide range of customized tools that provide the best results regardless of which industry you work in.

For instance, our sector: is textile design and printing. With the power of Photoshop and the external add-ons, we have in our hands the perfect tool to make our work faster and more efficient.

But do not forget that the job of a textile designer is not over when the design is finished, there are different processes that are necessary and we must ensure their success. One of the most important processes is Color Management.

Color management in textile design and printing

Color management is one of the most popular terms in our industry. Broadly speaking, color management is the process of converting the representation of colors in different devices (for example, converting the color we see on a screen to the one we will see on fabric) to reproduce colors as accurately as possible. When we start a creative process, we imagine shapes accompanied by a color palette. This same palette is the one we reproduce when we design and the one we expect to be printed at the time of production. Furthermore, one of the particularities of the textile sector and in particular digital printing is the repetition of the productions: We launch a collection, produce a print run and if it has succeeded, we produce it again. With good color management, not only will it be possible to print what we have sold but also we will be able to repeat the production as many times as necessary without changing the result.

So why do you need to know about color management if you are a textile designer? Because it is the only way that the colors we imagine in our head, which we later capture in Photoshop, will be the same ones we will see printed in the collection.

Why choose Photoshop for color reproduction?

To the initial question of the post Why is Photoshop the best tool in the market for textile designers? The answer is: Because it is the tool that will best suit your color management needs.

And, how do we do it? Photoshop has four key processes that will help us maintain color accuracy throughout the design and printing process:

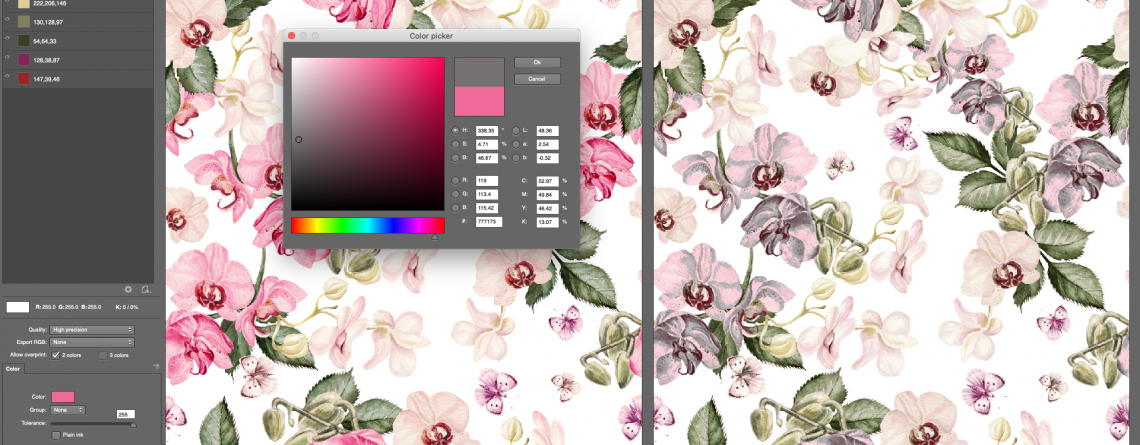
  • Allows you to work with embedded profiles: This makes it much easier to work with color management. If we work with an image with an embedded profile, we will see the colors that your output device will be able to reproduce, and we will also be capable of maintaining this information for the production department.
  • Allows you to assign color profiles to your designs (Edit > Assign profile): With this tool, you can change the profile you will work with. We will change the initial profile of the image for the one we select. In this process, the RGB coding is maintained but the colors will be changed since the color profiles are responsible for giving the values to the RGB. If these are different, the colors will change to fit the selected profile.

  • It has the functions to convert (Edit>Convert to profile) and test a profile (View>Test Fit): The difference between assigning and converting a profile, is that the latter, when we select a profile for change, will not maintain the RGB coding, trying to preserve the color results as much as possible within the profile. The function of testing a profile is very similar to that of converting the profile, but it simply shows it in Photoshop, without modifying the image. This way, we can simulate the output colors of the job. The function of testing a profile is very similar to that of converting the profile, but it does not modify the image, it simply displays a preview of the results in Photoshop. This way, we can simulate the output colors of the work. If we use both tools at the same time, we will have our design prepared with the profile we want to use and, in addition, we will be able to see the simulation once printed on paper or fabric

  • You will be able to send a file to be printed preserving the color management previously done: Finally, the same tool, as we have mentioned before, will allow you to send all the information about the image and the profile to the production department, so as not to lose any information of our work.

If you want to know a little more about it, you can watch this webinar where Gerard explains in detail the steps to follow for color management with Adobe Photoshop®. If you have any comments or questions, you can write to sales@inedit.com

Read more...

Introduction to color management with Adobe® Photoshop

Adobe® Photoshop® is one of the main tools used for textile printing designers. But how should we manage color so that our textile design can be reproduced accurately?

In this Webinar, you will discover the answer to questions such as:

Why do we need Adobe® Photoshop® to print colors precisely?
How to use color modes?
What is a color profile and how to use it?
How to work in RGB mode?

Click on the video and enter the world of color management for textile design:


Read more...

Inèdit Software presents neoStampa Delta, featuring a DTG mode and a new PDF print engine.

The new release of Rip Software will feature a new engine for faster and more accurate PDF printing, a specific mode for DTG and  performance and color reproduction improvements.

Barcelona, November 9th 2020

On November 4th, Inèdit Software presented the new version of neoStampa Delta. They did it from a virtual event where the same creators of the software and several collaborators exposed the news of Rip Software, which aims to be a revolution in the digital printing sector. 

Until now, neoStampa has been the reference Rip Software in digital textile printing, especially for the most demanding ones with color reproduction, achieving the maximum potential of their printers. With the Delta version, the company intends to go one step further and extend the scope of neoStampa to other sectors such as sports printing, film, ceramics or DTG printing. 

One of the main new features of neoStampa is the incorporation of a new PDF engine, the Mako® system from Global Graphics®, which enables any PDF/X standard file to be replicated, guaranteeing consistent results. In addition, we can see an improvement in performance, printing up to 5 times faster. 

The incorporation of an improved PDF engine will allow the Rip Software to be for the first time a perfect option for sectors such as sports design printing, advertising graphics printing, ceramics, film, among many others. 

On the other hand, neoStampa Delta also includes the new DTG printing mode with which it will not only be possible to print directly to garment with better color results, but also to save up to 50% of white ink. neoStampa Delta includes a calibration wizard in just two steps and also a new white base adjustment under semi-transparent areas, which will allow  the savings mentioned above. 

Finally, neoStampa Delta has a new cost control system with which it will be possible to track jobs in real time, knowing the meters printed, the speed and the ink consumption, of all printers. 

With the incorporation of all these innovations, Inèdit Software offers to the digital printing market a versatile version, with a multitude of applications, in order to obtain the best color reproduction of each print. neoStampa is compatible with more than 700 digital printers and every month they are offering new compatibilities to the market. 

Inèdit Software has not yet revealed the release date of neoStampa Delta, however all the information is already available on its website, and there are also different ways of contacting those who want to try the software for free. 

More information: https://www.inedit.com/en/neostampa-delta/

Read more...